Building a Model in RouteMaintenance
A step-by-step handbook for new technical writers
Content Development · Onboarding
Source: “Building a Model — All Applications” (V06-2026)
How to use this handbook
This handbook teaches you how to build a model in RouteMaintenance — the fixed-plant, facility-based application where the person on the job moves from one asset to another through a plant, in a single work order. RouteMaintenance leads here, but the build process is shared across every EMI3 application, so you will also learn the asset-based path as the contrast you need to choose correctly.
Read it in order the first time. Each phase builds on the one before. Keep it beside you while you build your first model, and use the field glossary as your lookup for any screen or field.
REMEMBER You are building a detailed digital work instruction for the person on the job. Give them everything they need to do the work safely, efficiently and at a high quality — without coming off the job.
Why models exist: a model is the basis for executing a service so everyone does it the same way, every time, using the latest information, in a structured and efficient format. The site strategy is defined within the model and applied to the operation. A model holds the digital work instruction to perform the service as the OEM, the site maintenance-management team, and site safety policies and procedures require.
The mindset — three ideas to hold onto
1. You write for the person on the job, not for yourself
The end person must understand exactly what to do, how to do it, and what they need to do it safely and well. If they have to stop and ask, the model has failed. Every field exists to serve that person at exactly the right moment.
2. The system asks questions in a set order for a reason
The build follows a fixed tab flow. At each phase the system is really asking, “does the end person need content here to do the task?” Follow the flow. Do not skip ahead.
3. Structure first, tasks second
Getting the structure right — Details, Stages, Areas, Intervals, Roles, Questions — is most of the job. If the structure is wrong, adding tasks forces heavy rework. Spend the time up front.
The build at a glance
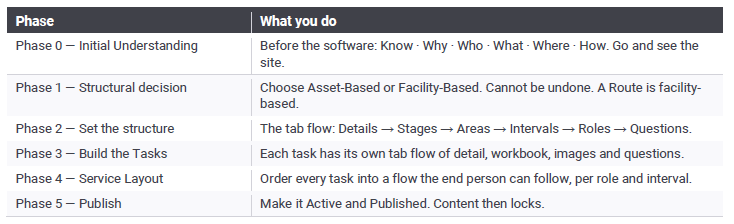
Six phases take you from an empty model to a published one:
There your work fits
Building a model is Step 1 of a four-step cycle. Your model is the seed of everything that follows, and feedback from real jobs comes back to you to improve it.
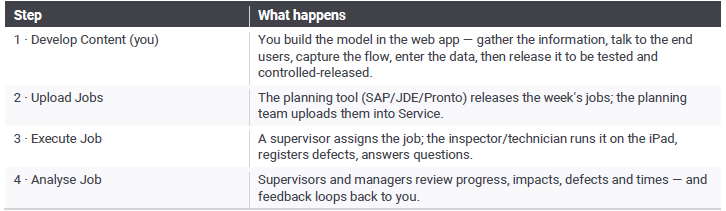
Where you sit: as a Content Writer you develop and edit models and apply approved feedback, then assign the release of a completed model to Document Management, who make it Published. So “getting it published” usually means finishing your content and handing off — not clicking Publish yourself.
REMEMBER Logins passwords are never shared. The service report is a legal document that can be presented in court, and the person logged in is responsible for the tasks they complete — so the roles, questions and sign-offs you build carry legal weight.
Phase 0 — Initial Understanding
You need this understanding before you open the software. Go and experience the location — capture the layout, the flow and the constraints. Do not build from a desk.
Answer six questions and document them
• Know — the area, the assets, the intent. What are the expectations and the reasons?
• Why — why are we doing this, and why does it matter? Is it an inspection or a service?
• Who — which roles perform the job, what is their skill set, and who are the key stakeholders?
• What — which assets, which department, and what existing information can you use?
• Where — which area or areas, what are their constraints, and what is the layout?
• How — how will it be done? Instructions, specifications, reference material, safety considerations.
Then, before building
• Spend time thinking and documenting the requirements.
• Communicate to all key stakeholders.
• Project-manage the process.
WATCH OUT - The most common new-writer mistake is opening the software first. Phase 0 is the job. A model built without seeing the site will need rework.
Phase 1 — The structural decision
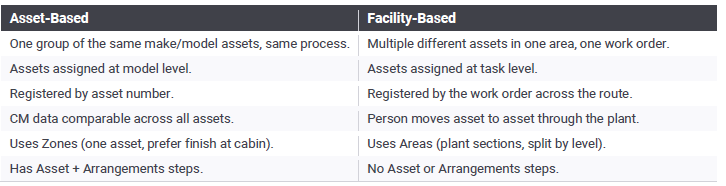
Choose Asset-Based or Facility-Based. This choice cannot be undone without rebuilding the model from scratch. For a Route, the answer is facility-based.
Zones vs Areas
Both break the work into a spatial sequence the end person flows through. Zones compartmentalise one asset. Areas break fixed plant into sections by layout, and can be split by levels. If you walk through an area, out, and back to it, list that area twice — named differently. And remember: the larger the area, the more tasks it carries without a break, which is a worse experience for the end user.
Defining the Name
Consider the name of the model carefully. Do not use the same name as another model. Also check if Planning already register planned work to this route. Use the clients planning terminology or standard job name that would cover this planned work.
Phase 2 — Set the structure (the tab flow)
SPEND THE TIME HERE Getting the structure right is the most important part of the build. If it is wrong, adding tasks later forces a lot of rework.
For a Route, follow the tabs in order: Details → Stages → Areas → Intervals → Roles → Questions.
Details
Sets up the model for future selection and service/job registration.
• Departments — assign who can register and perform a job. Only selected departments can.
• Settings / toggles — switch functionality on or off, specific to this model.
• Model image — shown on mobile when the person starts the job, as a visual check they picked the right model.
• Document — for your reference as the content developer only. Not shown anywhere else.
• Notes — record the strategy and roles for the model. Visible only on this screen.
• Active / Inactive — Inactive blocks new registrations without deleting. No history is affected.
• Status — moves the model through approval toward Published.
Stages
Where you define the overall process the user goes through, sequenced top to bottom.
• Tick the “has areas/zones” box for any stage that contains areas or zones — otherwise they will not be required on tasks and will not appear in the service layout.
• Design the stage graphic in MS PowerPoint and upload it. It is shown to the user on mobile as they work.
NOTE: Often a site has no defined or documented process. When that happens, it is your job to define and document it for them.
Areas
For a Route you work in Areas, based on plant layout.
• Areas can share a plan view but be split by levels in the plant.
• If you walk through an area, into another, and back, list that area twice, named differently.
• Prefer smaller, well-named areas — large areas carry many tasks without a break.
Intervals
• Standalone — an interval that includes no others.
• Auto-include — tasks on the top interval cascade down to lower intervals when the matrix is applied. Example: change engine oil every 250hrs then appears at each interval.
• Task List Number — a code used when the client registers the schedule with the upload tool. Optional; can be added later.
Roles
• Roles are assigned by qualification, and different roles do different tasks in each stage/area. Typical roles: Technician/Serviceman (spins filters, changes oils), Inspector/Mechanic/Fitter (tradesperson, identifies defects), and trade-specific roles (Plumber, Boilermaker, HV Electrician).
• You need at least one role, assigned to All Departments or a specific department listed in Details.
• Map a role from Application Settings. You can rename it; all users with that mapped role and department can perform its work.
• Use multiples (Inspector, Inspector 2, Inspector 3) mapped to one role to help assign tasks — anyone assigned that role in the department can perform all of them.
Questions (model-level)
Added to gather information from the user, or to confirm they understand what is expected.
• Appear when a person logs into a new or stopped job; compulsory ones must be answered to proceed.
• Can be placed before a stage or area/zone, or at the end. Assign the same question to multiple roles.
• Be specific, keep answer options blunt, and use them sparingly.
CHECKPOINT - Spend the time getting the structure right. If not, it will require a lot of rework when you start adding tasks.
Phase 3 — Build the Tasks
With the structure set, build the task list. Each task needs its critical fields populated.
Where to start
• Work from the flow you captured on your walk-around and the images you collected. Have a start point (a “Move to”), then the tasks each role performs at that asset, for each interval.
• Some tasks are only done by some roles and some intervals — think of all of these.
• Refer to site service/inspection sheets, OEM manuals and parts books. Mark off the minimum requirements as you go.
• Capture a gap analysis — questions, missing information, anything not right — and keep written communication with the client on outstanding points. Do not assume you have everything you need to start.
NOTE: Follow the tab flow to complete each task. If information is still outstanding, add it to the task detail notes — those notes are not shared anywhere else in the application.
Speed-up tips
• Template model — build one that already holds your standard start questions and common tasks, then duplicate it to start each new build faster.
• Copy vs Duplicate — Copy pulls a task (or its questions) from another model into this one; Duplicate adds a copy of a task within this model. You can copy multiple task questions in one action.
• Task upload — bulk-populate tasks from a CSV template (text and dropdown fields only). For the Cannot Hold and Safety Critical columns, enter Yes / Y / 1 / True to tick the box. Missing compulsory fields are flagged for attention.
The task tab flow
Each task carries its own sequence of tabs. Work through them in order:
1. Task Detail — fill the compulsory fields. The Action verb sets the intent: Inspect = visual, Check = physical. Keep the task name short. A multi-role task appears at each point it is assigned.
2. Task Intervals — assign the interval(s). If auto-assign is on, use the custom interval toggle to tick or untick per your task strategy.
3. Task Stages — assign the stage(s). It reflects to each role and interval the task is assigned to.
4. Task Areas — assign the area(s). A task in a stage with no area/zone appears only in the stage. A task can be in a given area only once — to repeat it (e.g. Inspect Fire Extinguisher), duplicate the task.
5. Lubricant — if the task fills or checks a fluid, set lubricant, unit of measure and volume. Level-check only: Volume 0 / UOM Top Up / SAE30. Grease example: Volume 5 / UOM Pumps / SBX Grease.
6. Parts — add part details. Shown in preparation (checked off before the job) and at the task. Enter only this task's quantity; the system totals across the job — the part number must be exactly the same.
7. Tools — add tool details. The same tool across tasks is presented as 1 — spell the description exactly the same everywhere.
8. Permits — add permit details. Works like tools when the same permit applies to more than one task.
9. Workbook — the detailed instructions. Use statements, not long sentences. Number each step. Set breaks. If very long, split into more than one task. Write to ASD-STE100 Simplified Technical English.
10. Images — add only images of value (up to 8); edit them to highlight the focus area; keep descriptions as statements. The Paste Task Name button reuses the task name as the description.
11. Questions (task-level) — to understand condition, or to check/challenge a critical step. Be specific and blunt, and put the unit of measure in the text, e.g. (psi). Dropdown and check-list answers can raise a finding; a numerical question with a min/max turns on CM trending. Request an image from a question to capture a compulsory reference photo without raising a defect.
12. Attachments — PDF, a short video, or a web link (WIFI only; access rights if inside a client network). Be careful with videos — they can slow sync and cause login timeouts.
STE100 - Never ship workbook procedures as ordinary prose. Route the procedure text through a Claude ste100-expert skill (available on request) so it is clear, unambiguous and easy to translate for a field technician.
Phase 4 — Service Layout
Once the content is added, it must flow in a simple, workable sequence for the end person. Poor flow causes frustration and disinterest — this is a very important phase.
• Flow every task, thought through carefully, for each role and interval.
• Drag and drop tasks to suit the flow.
• You cannot move a task out of its assigned stage or area here — go back to the task to reassign it.
• Use the hyperlink feature to move between the layout and the tasks. A new task lands at the bottom of its stage/area; a duplicated task lands below its original.
NOTE Filter caveat: with role filters set, hyperlinking from a task on a different role will not show it. Change the role in the filter and it appears.
Phase 5 — Make it Published and Active
When everything is complete and ready for the end users, make the model Published and Active.
• You may not be allowed to publish — it can go to a senior role, a review team, then a dedicated publisher. This controls safe content release.
• A review date can be set on an active model; it shows when the next review is due and turns red once that date passes.
• Once Published, no content changes can be made — only new assets, notes or model documents can be added.
• Version dots: a once-active model shows a red dot; only an active model with a green dot is presented to the iPad.
After publishing
New Version
A Published model can be converted to a new version, which brings it back to In Development while the published version keeps running in the field without impact. View any previous version via the 3-dot feature.
Duplicate a Model
From the Model List 3-dot menu, Duplicate replicates a published or in-development model into a new model that must be renamed and edited as its own.
Remove & Restore a Model
Behind the same 3-dot menu, publish-level positions have a Remove option that takes a model off the model list. It's a restricted feature — think through the ramifications first. Historical service data is not lost, and if you have remove rights a Restore Model button (top right) recovers it.
Reports
The print icon opens PDF reports to view or download — set your filters first so the report covers the role, interval and scope you want.
The content-developer mindset
EMI's key focus points — the difference between a model people trust and one they work around:
13. Develop content with the user's needs in mind. What do they need to know about this task? Everything.
14. Listen to the end user. People engage far more when listened to and their input applied — so monitor and respond to feedback.
15. Don't use actual-vs-estimated times as a performance stick. Use them to improve the process; manage people on skill, attitude and involvement, and the target times will follow.
16. Ask blunt, specific questions at task level. A statement, not a sentence — with an answer format that fits and has value to everyone using the data.
17. Set expectations. Define the standard you require for defect details — wording and structure — so what comes back off the job is consistent.
18. Use the reporting. To improve the process, understand what's happening (pauses, skipped tasks), and ask bigger questions of the data.
Spend time going through other existing models on the iPad app to see how they were developed. And — do not be afraid to ask questions.
Enjoy.
Take on a New Path
Was this article helpful?
That’s Great!
Thank you for your feedback
Sorry! We couldn't be helpful
Thank you for your feedback
Feedback sent
We appreciate your effort and will try to fix the article