Developing and editing models
Edit a new model
– Click on the here dots to the far right of the row to expose the menu list
– Click on edit
– Or click on the model hyperlink
You cannot edit a model that is active.
You can change an active model to edit by clicking on the new version button top right of the opened model screen.

Duplicate a model and rename it is an easy feature behind the three blue dots.
The Remove option is available, which enables positions within the policy group that can publish a model can "Remove" a model from the model list screen.
This is a restricted feature to control who has access to see this feature to perform the removal of a model.
It is highly recommended to be seriously consider the ramifications when performing this function.
The historical data of the completed services is not lost, the model is not available in the model list again.

If the user has access to remove a model it can be recovered.
A "Restore Model" button will appear in the top right.

Click on this to view the removed model and restore.


All good, you're saved now.
New Model
Easy to start a new model by clicking on the new model button top right of screen.
Fill in the start details and build away.
Suggestion
– Build a template model that has many of your standard start questions and tasks to speed up the initial development

Version Control
Click on the View Version link.
Presents the current and previous model versions.
A model that has been made active but is no longer active is identified with the red dot.
Only an active model with a green dot is presented to the iPad application.
A previous version can be opened and the placed back into development by clicking on the new version button, once opened.
Version number is self populated by the system when a model is started or the status has been changed to a new version.


Details
Change the model version
– Click on new version top right button
– This changes an active model to a new version
– The active model stays in use until the new version is made active
Change status enables you to change a model that is not active into another status
– If you do not have the privilege to make a model active it will present a popup outlining this limitation
Make a model active/inactive
– The purpose is to enable you to not show the model in inspections so that they cannot be selected
– It can be used during initial testing or that you want to shut down the model but not delete it and lose the model content
– Any inspection performed will not be lost and still accessible when in the inactive position


Add/Edit Model Details.
Assign a model to a department or departments
– Models assigned to a department will present these models to users assigned to these departments. Additionally, it will default some screens on start up and the user will have the filter defaulted to their assigned department
Settings can be set to trigger actions on the iPad application.
Add a model image via drag and drop or browse option.
Add model associated documents via a drag and drop or browse option.
Add notes.


Review Date
The review date is a column to show document management when the next review of the model is expected.
– A red highlighted date indicates that the date for review has passed
A review date is only set when the model is active.
A review date can be changed to an active model.


Stages
Add or edit a new stage is easy.
Select the add new button top left.
Add an image by drag and dropping or browse a folder.
To change the stage flow click on the icon to the far left and drag the row to the location that best suits your new flow of stages.
The stage image of the process flow is made within MS PowerPoint and converted to an image to be added as a jpg or png file format.
Stage with the “has operations” box ticked will force the user to assign the task to the stage to an operation.


Areas
Areas is part of a segment to the job.
Each area is set up now so that when you build your tasks you can assign the task to an area within the stage.
This is a structural feature to build the model around.

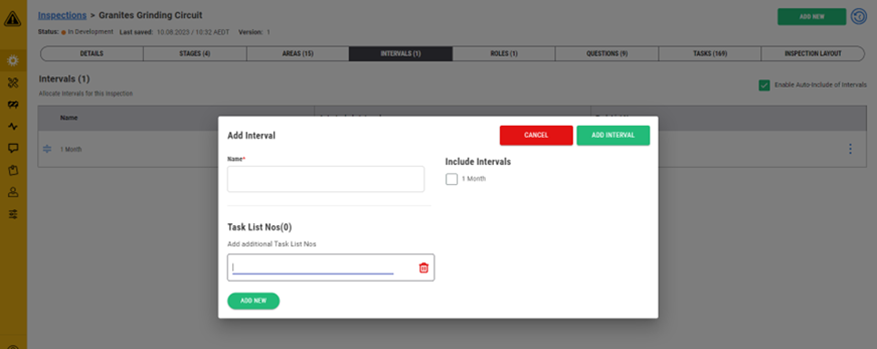
Intervals
An interval is a defined instruction which will have many tasks assigned to it to perform the job.
A model can have many different intervals that tasks can be assigned too.
If you have multiple intervals you can set the rule by clicking on the “Include Interval” box to assign all tasks that are assigned to the top interval will apply to all the other intervals added.

Task List Numbers
Adding a task list number at the interval level provides a unique code that can be utilised when registering the job.
You can add as many task list numbers you like to an interval
– You’ll need the task list number to register a job via the upload tool
A task list number can be from SAP or you can make a unique code that can be applied.
– Eg GGC-1 or A-09883
Roles
Assigning roles to the model enables you to assign task to the role.
This means you can have many different roles on the job, each with their own assigned tasks structured to align with the inspection process.
You can map a role
– Mapping a role means that you can use an existing role that users are assigned to but they will also be able to play the role of the one you have added without making changes to the user group.
– For example. Inspector is in the role list but you are going to need 3 different Inspector Roles to do the job. Add a new role at the model called Inspector 1, Inspector 2 and Inspector 3 all mapped to the Inspector role
Assign department to the role
– A role can be assigned to all departments or to a specific department. If assigned to a specific department, any users in the other departments assigned to the model with this role option will not see the registered jobs for this model


Questions
Add start questions to the model
– These are presented on the iPad when the user starts the job
– They are a list of safety, policy type questions as well as general information that you wish to receive information about
– Start questions are presented every time a person starts the job, even when it has been stopped and restarted by another person, they will have to answer the same questions
So be mindful of what type of questions you want answered and how you want them answered
– There are many different types of question styles that you can ask and the answers will be structured around the type you selected


Tasks
Start building your tasks to perform the job that needs to be performed
–Eg Inspect a workshop
You need to understand the process, who is involved, what needs to be done, how, what permits or tools needed. You’ll need to know what the instructions are going to be and how it is all going to flow in a step by step process
– This is a very complex phase of the building of a model but we have designed the software to define the information required in a easy to relate to process of information collection and presentation
Copy or duplicating a questions is available
– Copy from another model and paste to the model you’re working in
– Duplicating only adds the task to the existing model
– Here you can copy task questions and paste them to another task


Task Details
Click on the tasks to dropdown the new view
– The task is broken down into 12 additional tabs
Not all the tabs needs to be populated. There are some fields that have a red asterix which indicates it as a compulsory field.
Work through each field and select from the dropdown list or add the free text.
Notes are for the content developer to share points. These are not seen anywhere in the application suite other than here.


Task - Intervals
Assign the task to a interval or intervals.
This means that this task will appear when this interval is registered to the job.

Task - Stages
Add the task to a stage or stages.
Assign assets to a stage.


Task - Areas
Add the task to an area, if required
– Only stages with areas will make this a compulsory field to complete
This task will now appear when this stage is presented and the area is ready to be completed for the selected job.
Assign an asset to the area which is linked to the task.
Complex, I know but you’ll see it come together soon.

Tooling
If required, add a tool or tools to the task
 Permits
If required, add a permit to the task

Task - Workbook
Start adding the information to perform the task safely and efficiently with all the required information.
Not all the fields need to have content but it’s best that the end user has as much information as possible so they can perform the job to the best of their ability.
When writing this information
– Keep it simple
– Keep it clear
– Do not write length sentences
– Break it down into steps
– Use the highlights, bold, underline or italic sparingly
–Keep it simple
If you have a large list of steps to perform the task, consider if the task can be broken down into several.

Option to add red text to a workbook or notes field is available.

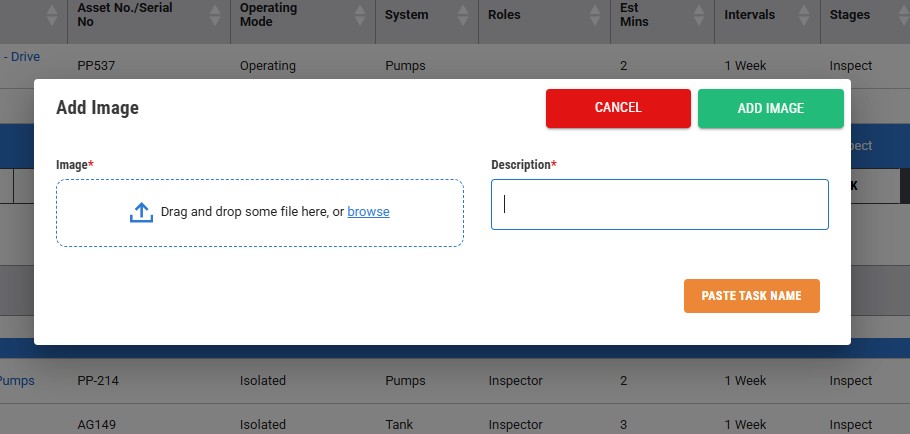
Task - Images
If required, add an image or images
– Up to 10
– Use images sparingly to save of data uploading during sync process
– Add images that add value not just for the sake of adding an image
Also "Paste Task Name" button enables you to quickly use the task name as the description

Task Questions
If required, add a question or questions to the task.
Define why type of question you’re asking based on the answers you’re trying to collect.
Be specific and blunt with the question
– Do not write a sentence
– Add in the unit of measure in the text (psi) or (ohms)
Make the question compulsory if you must get a response.


Dropdown or check list types can have multiple options to select from
– Dropdown only one option can be selected
– Check list multiple options can be selected
– You can add the function to “raise a finding” if the answer is selected
Numerical questions
– Without a min/max value the answer is not trended
– With a min/max value added the CM trending feature will be presented to the end user


You can paste questions from other models or from within the model.
You can copy multiple questions from a task and paste them all in one action using these buttons.

You can request an image from a question is a feature to capture a photo and store it against the task question and service without having to register a defect for something that is not a defect/finding.
An example will be to show the condition of a specific part like a magnetic plug for future reference. You can tick the box in the task question and that will trigger the feature to appear on the iPad application to take an image when the question is answered. It's compulsory so it needs to be taken to move to the next task. Only one image can be taken.


Task - Attachments
If required, add an attachment or attachments
An attachment can be
– A document
– A link to a document or website
* A link needs to be available to the user group you’re asking to perform the task and use the information in the link
– Be careful adding documents or large files as it will impact the sync process to the iPad application and it could impact the performance of the device if memory is low

Job Layout
Job layout enables you to flow the job down to
– The role
– The interval
Click on the task hyperlink to take you back to the task.
Click and drag the task to the desired spot using the icon to the far left of the task.
New tasks added will appear at the bottom of the stage or operations list.
Flow is the most important requirement of the content developer to get correct
– Ask questions and work with the people that do the job to ensure the flow works


Select the “Switch to Inspection Layout” will take you direct to the task in that screen
– If the filters are not to the role or interval, the task will not appear
– If it is presented, it will be highlighted in yellow

END:
Was this article helpful?
That’s Great!
Thank you for your feedback
Sorry! We couldn't be helpful
Thank you for your feedback
Feedback sent
We appreciate your effort and will try to fix the article