Connect your reporting tools or data warehouse to EMI3. Learn how to use Swagger, sign in to the correct site application and retrieve the data your account is authorised to read.
This guide is for developers building an integration. Use it alongside the live Swagger reference, which lists the available operations, parameters and schemas.
Ask your EMI administrator or implementation team to confirm the integration account, its read permissions, the site applications to include and their IDs. For a scheduled integration, agree the account and licensing arrangements, expected data volume and refresh frequency.
In this guide
- How the API fits into your integration
- Understand sites and site applications
- Make your first request in Swagger
- Choose the endpoints you need
- Manage authentication in your integration
- Build a repeatable warehouse load
- Troubleshoot requests
- Prepare for your first scheduled run
1. How the API fits into your integration
EMI3 exposes an HTTPS API that your integration calls to retrieve JSON data. Swagger is an interactive reference for that API: it lets you inspect an operation and send a request using your credentials.
| Resource | Address |
|---|---|
| Production server | https://api.emi3.io |
| API path prefix | /api |
| Interactive reference | Swagger UI |
| Machine-readable definition | OpenAPI JSON |
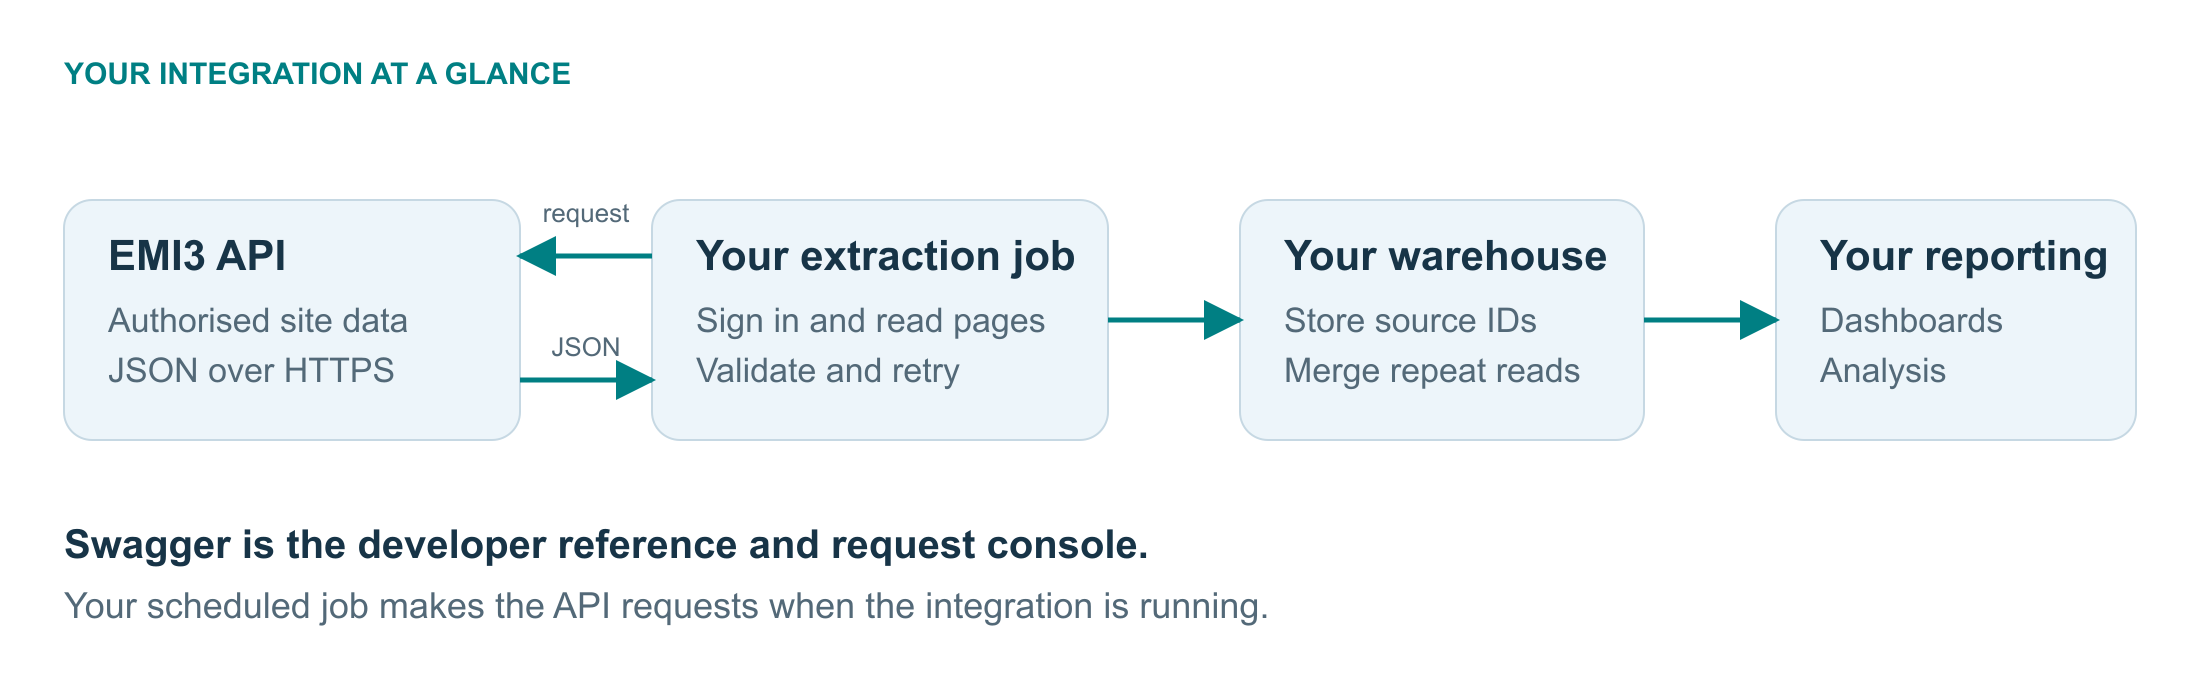
You can import the OpenAPI JSON into an API client or use it as a starting point for client generation. Validate the selected operations against an authorised response before relying on generated models.
The production Swagger page connects to production. Read each operation’s description before using Execute. This walkthrough uses login and data-read operations. Operations that create, update, delete, build or change status can affect live data; the HTTP method alone does not tell you the full effect.
2. Understand sites and site applications
A site is a physical location. A site application is an EMI application enabled at that site. One site can have several applications, each with its own access and operational data.
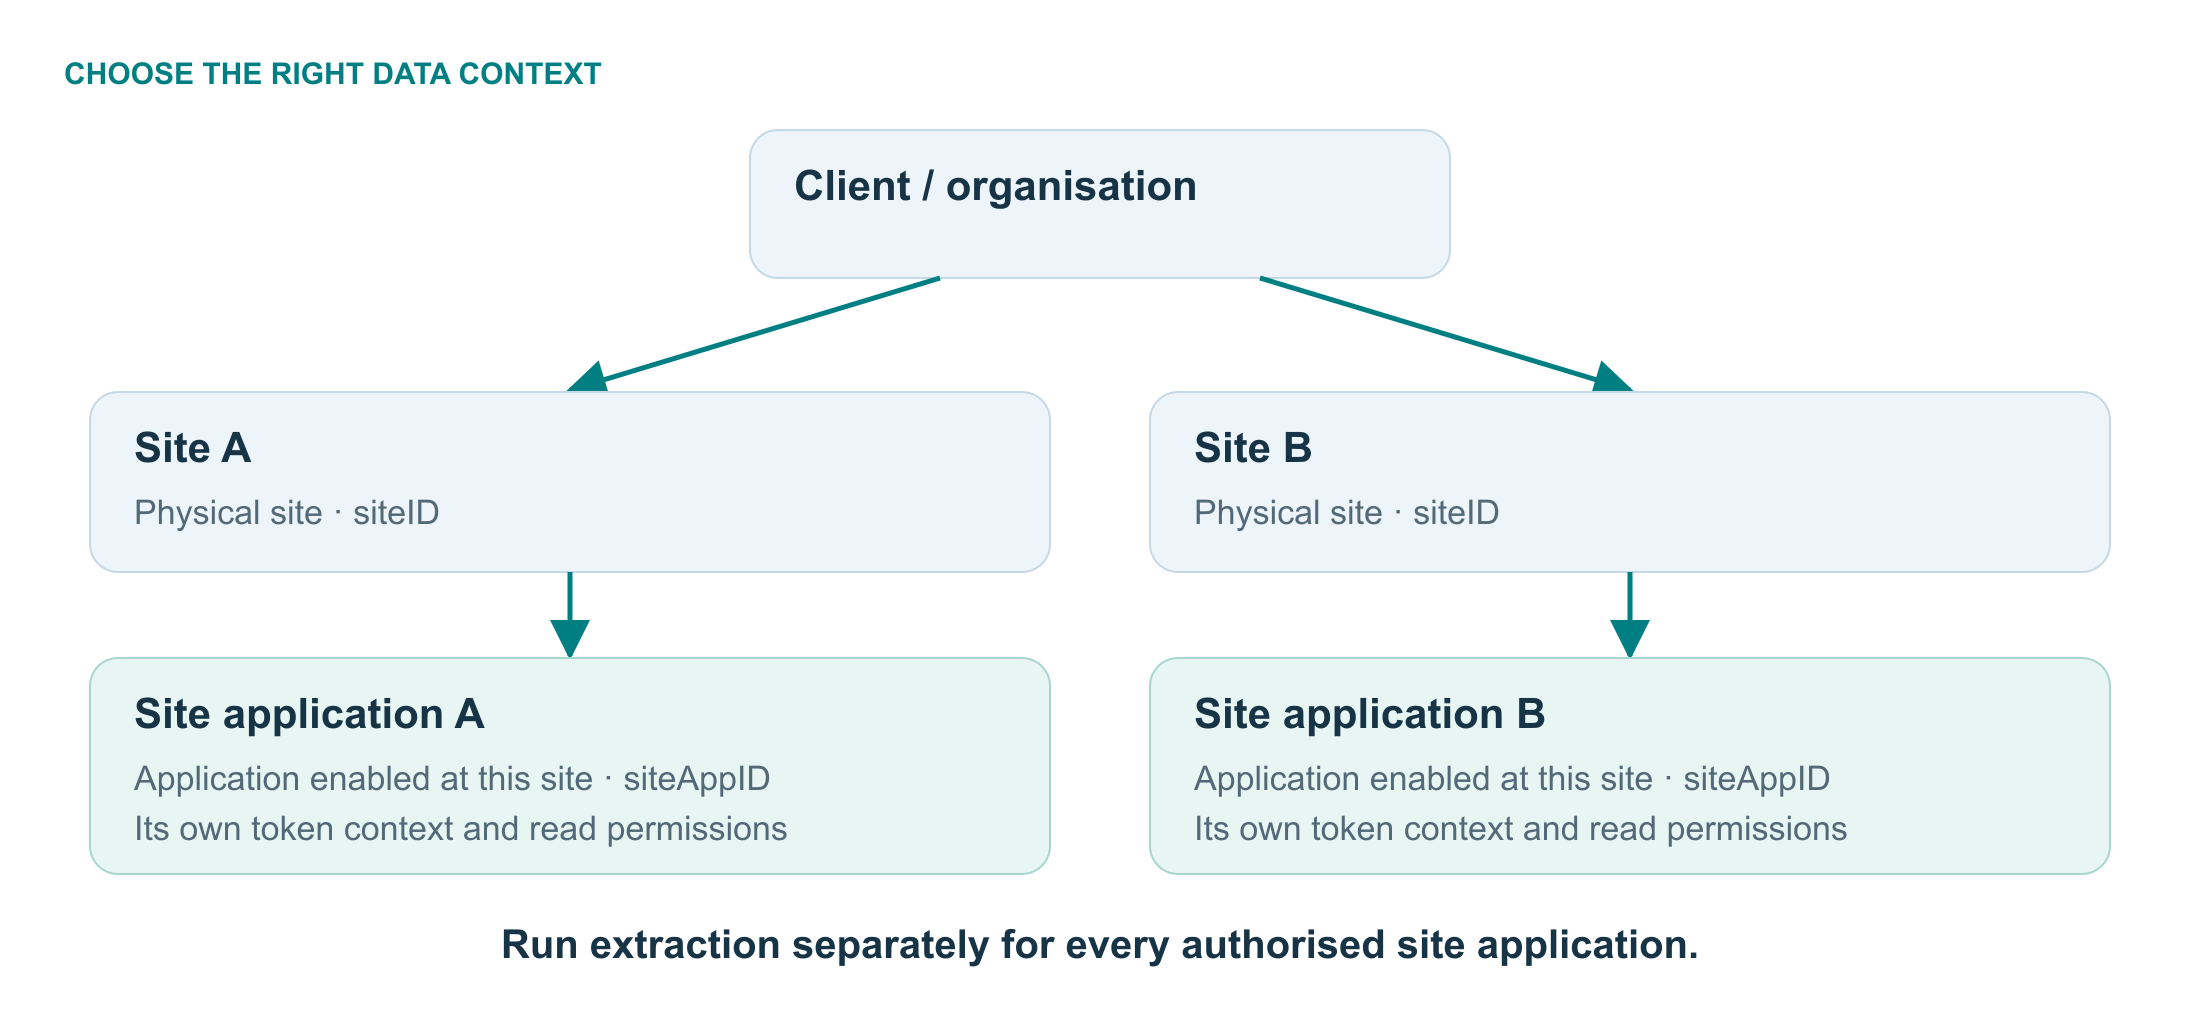
siteID and siteAppID identify different things. For site application reads, sign in to the required siteAppID and use the JWT returned for that context. Adding another site’s ID to a request does not grant access to it.
For a warehouse covering multiple sites, keep a separate token/cookie session and extraction checkpoint for each authorised site application. Record the source site and site application alongside warehouse records so their origin remains clear.
If you already know the target siteAppID, supply it during login. To discover available access, log in without it, authorise with the returned JWT, then use GET /api/Users/me/clients and GET /api/Users/me/applications?clientId={clientId}. The application results list each application with a sites array, and each site carries its siteAppID. Use GET /api/Users/LoginToSiteApp/{siteAppId} to select one, then replace the JWT in Swagger’s Authorize box with the newly returned value.
3. Make your first request in Swagger
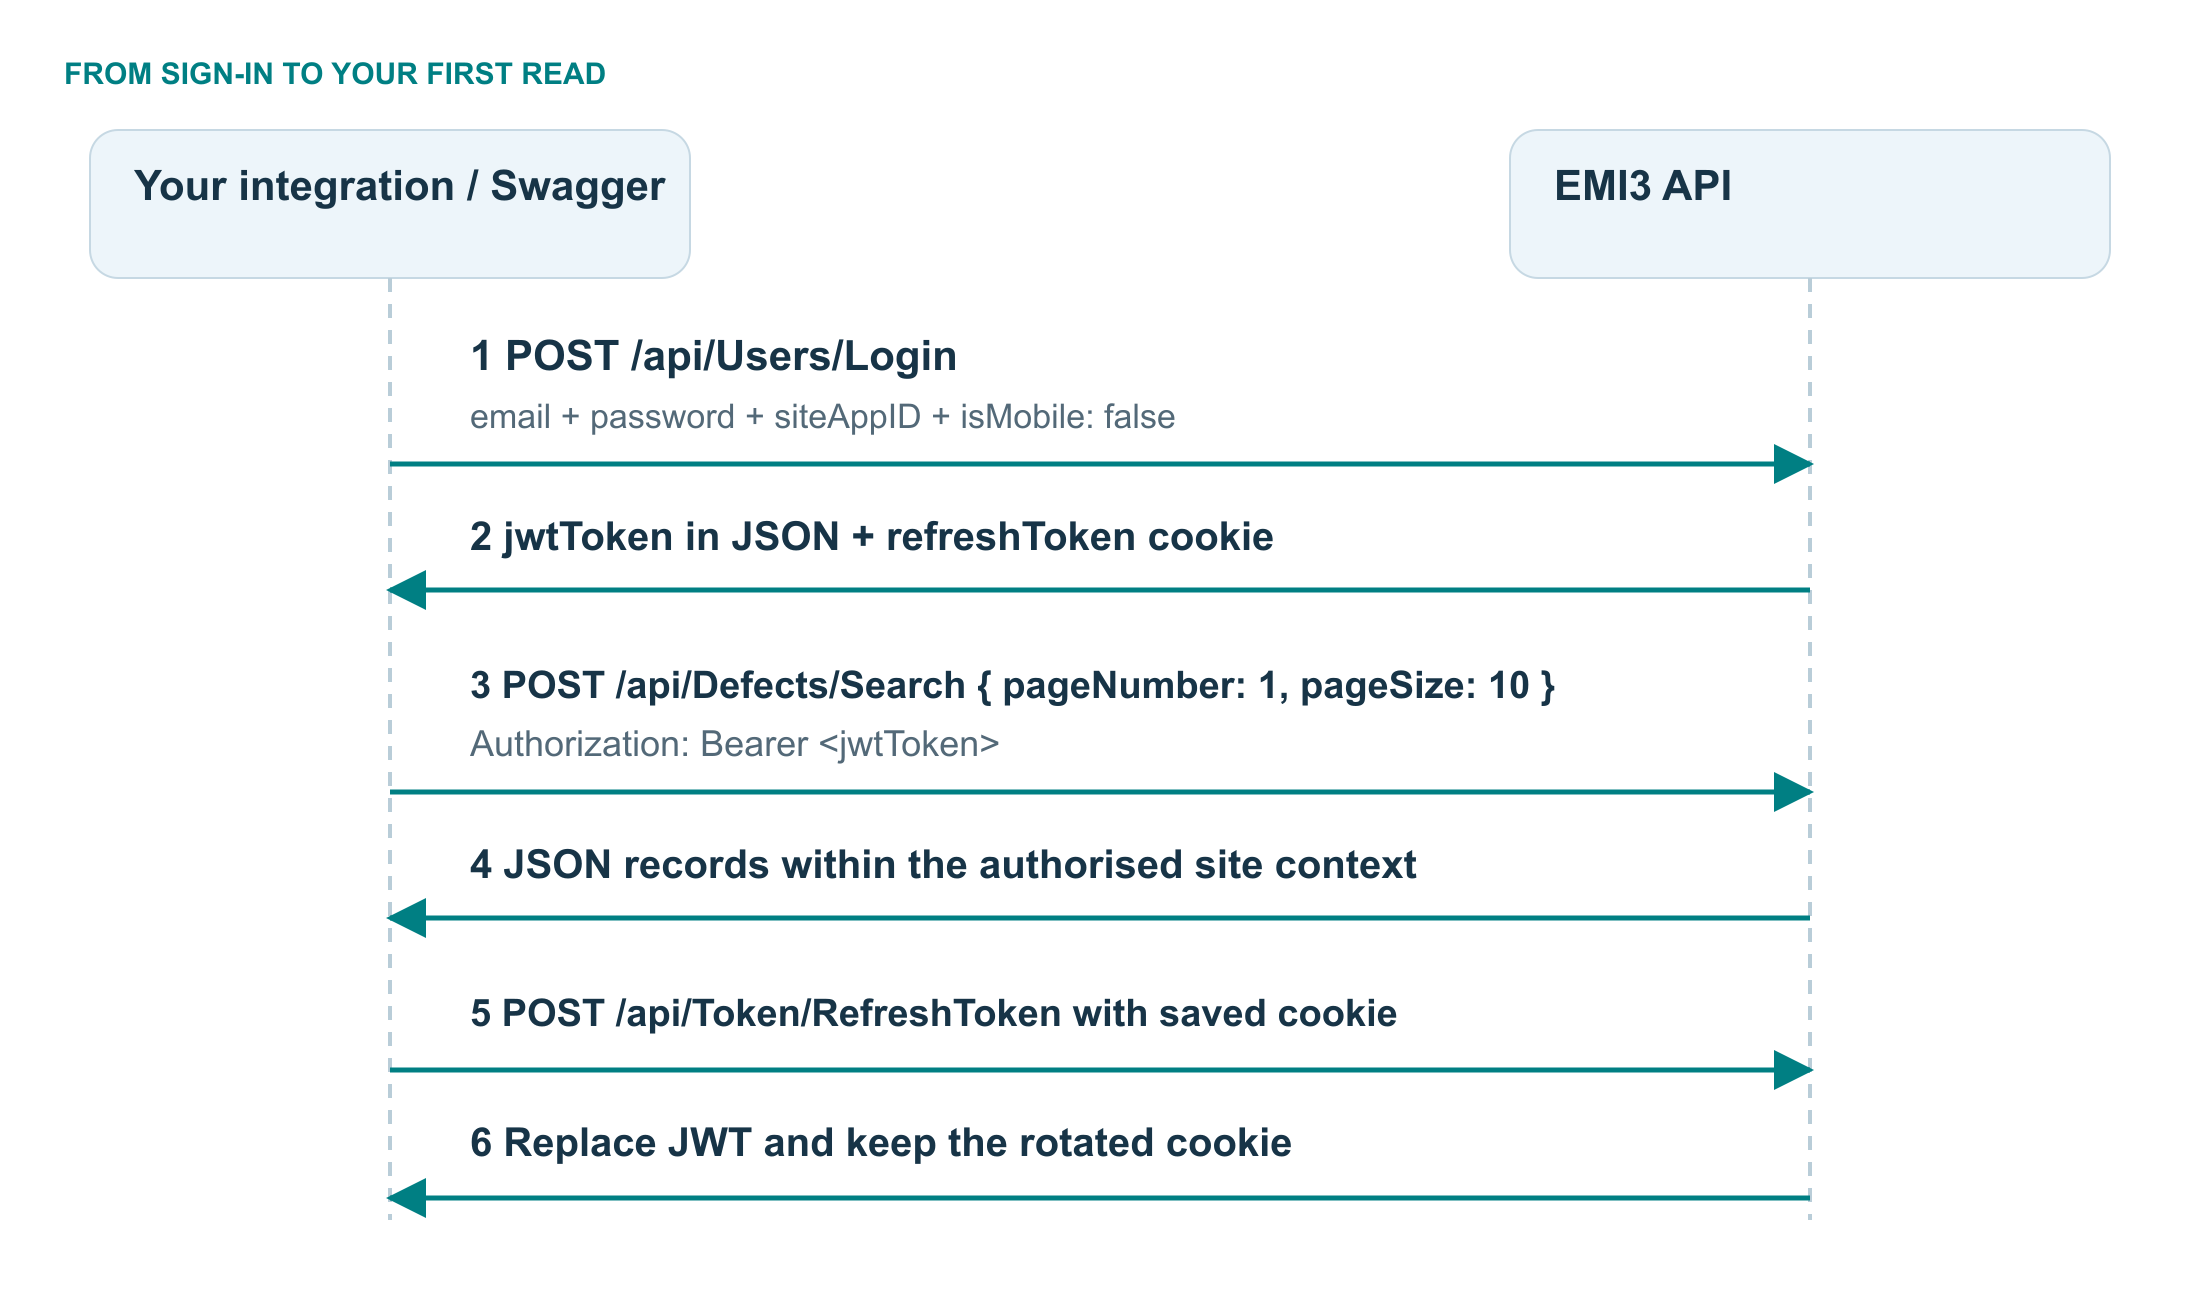
Sign in to a site application
- Open production Swagger and expand Users.
- Expand
POST /api/Users/Login, select Try it out and replace the example request body. - Enter the account’s email, password and confirmed site application ID. Use a JSON number for the ID and the boolean
falseforisMobile. - Select Execute. A successful response has HTTP status
200. Check the returnedsiteAppIDmatches the requested context and copyjwtToken.
Illustrative request: replace 12345 with your confirmed site application ID. It is not a real site ID supplied by this guide.
{
  "email": "integration@example.com",
  "password": "REPLACE_WITH_YOUR_PASSWORD",
  "siteAppID": 12345,
  "isMobile": false
}
Authorise and read a small page
- Select Authorize near the top of Swagger.
- In the Bearer field, enter
Bearerfollowed by the JWT, with one space and no quotation marks. Select Authorize, then close the dialog. - Expand Defects and
POST /api/Defects/Search. Check the required policy, Defects Read. - Select Try it out and replace the whole example request body with the JSON below. Swagger pre-fills every field with placeholder values (zeros,
"string"and the current date), and the API rejects that body with a400validation error. - Select Execute. Inspect the Request URL, HTTP response code and Response body. The generated curl command is useful when moving the request into your integration.
POST https://api.emi3.io/api/Defects/Search
Authorization: Bearer <jwtToken>
Content-Type: application/json
Accept: application/json

{
  "pageNumber": 1,
  "pageSize": 10,
  "sortField": "number",
  "sort": "asc"
}
Expected outcome: a successful list read, or an empty list when no records match in the selected context. Treat Swagger’s Example Value as documentation; the Response body under the executed request is the actual result. List and detail responses can expose different fields, and some list schemas are incomplete. Confirm the actual response shape before writing your deserialiser.
Keep credentials, JWTs, refresh tokens, cookies and generated curl commands containing tokens out of source control, screenshots, shared logs and support tickets.
4. Choose the endpoints you need
Expand an endpoint group in Swagger, then read the summary, required policies, parameters, request schema and responses for the individual operation. Similar endpoints may use different parameter names or response shapes.
| Data needed | Starting point | What to check |
|---|---|---|
| Defects | POST /api/Defects/SearchGET /api/Defects/{id} | The search is a data-read operation with a JSON request body. Requires Defects Read. Supports paging, since, includeDeleted and filters by status, type, risk rating, asset and model. Use the detail operation for fields absent from the list. |
| Services / work execution | POST /api/Services/SearchGET /api/Services/{id} | The search is a data-read operation with a JSON request body. Requires Services Read. Supports since and includeDeleted in the body. |
| Site asset register | GET /api/SiteAssetRegisters | Pass siteId (or siteAppId) to set the site scope, then use paging and hierarchy filters. |
| Models / templates | GET /api/Models | Site application context; follow the relevant model/version endpoints for deeper detail. |
| Lookup labels and IDs | GET /api/DefectStatusesGET /api/DefectTypesGET /api/DefectRiskRatings | Refresh mappings for each site application. Do not assume the same label means the same ID everywhere. |
| Aggregated reporting | Report groups exposing /api/Analytics/... routes | These return report-specific results. Use the applicable filters and schema. |
Example: read a page of services
Send this request using the JWT for the intended site application. It uses the same paging and sorting fields as the defects search: sortField and sort. Without a sortField, services are returned by scheduled date, newest first.
POST https://api.emi3.io/api/Services/Search
Authorization: Bearer <jwtToken>
Content-Type: application/json
Accept: application/json

{
  "pageNumber": 1,
  "pageSize": 10,
  "sortField": "scheduledDate",
  "sort": "asc"
}
Use Schema to inspect optional search filters before adding them. Omit unused dates instead of sending an empty string. Keep numbers and booleans as their JSON types.
5. Manage authentication in your integration
Send the JWT as Authorization: Bearer <jwtToken> on protected requests. Reuse it for that session and plan for expiry. A JWT is currently valid for 2 hours. Refresh it before it expires rather than signing in again; the refresh cookie currently remains valid for 10 hours after the most recent sign-in or refresh. Read the token’s expiry rather than hard-coding these values.
Login and site selection return the refresh token in two places: a refreshToken field in the JSON response and a Secure, HttpOnly cookie named refreshToken. Both hold the same value. Swagger’s response schema does not show the JSON field. Use an HTTP client with a cookie jar and preserve the cookies returned by login and site selection, and treat the JSON value as a credential: do not log or store it in plain text.
POST https://api.emi3.io/api/Token/RefreshToken
Cookie: refreshToken=<saved-cookie-value>
Accept: application/json
On a successful refresh, replace the JWT with the new jwtToken and retain the updated cookie. Refresh tokens rotate, so serialise refresh attempts within each session. Keep the selected site application in your own session state; a refresh response may not repeat all the site metadata from login.
Swagger also lists a token query parameter for refresh, which accepts the JSON refreshToken value. Prefer the cookie flow in your integration to avoid putting refresh credentials in URLs. If refresh fails, re-authenticate through the agreed account workflow and resume from the last successful extraction checkpoint.
POST /api/Users/Logout and POST /api/Token/RevokeToken revoke all web sessions for the account, not only the one that calls them. If your job runs several site applications with the same account, do not sign out after each one: it would invalidate the others mid-run. Sign out only after all site applications have finished, or let the sessions expire.
6. Build a repeatable warehouse load
Read all pages
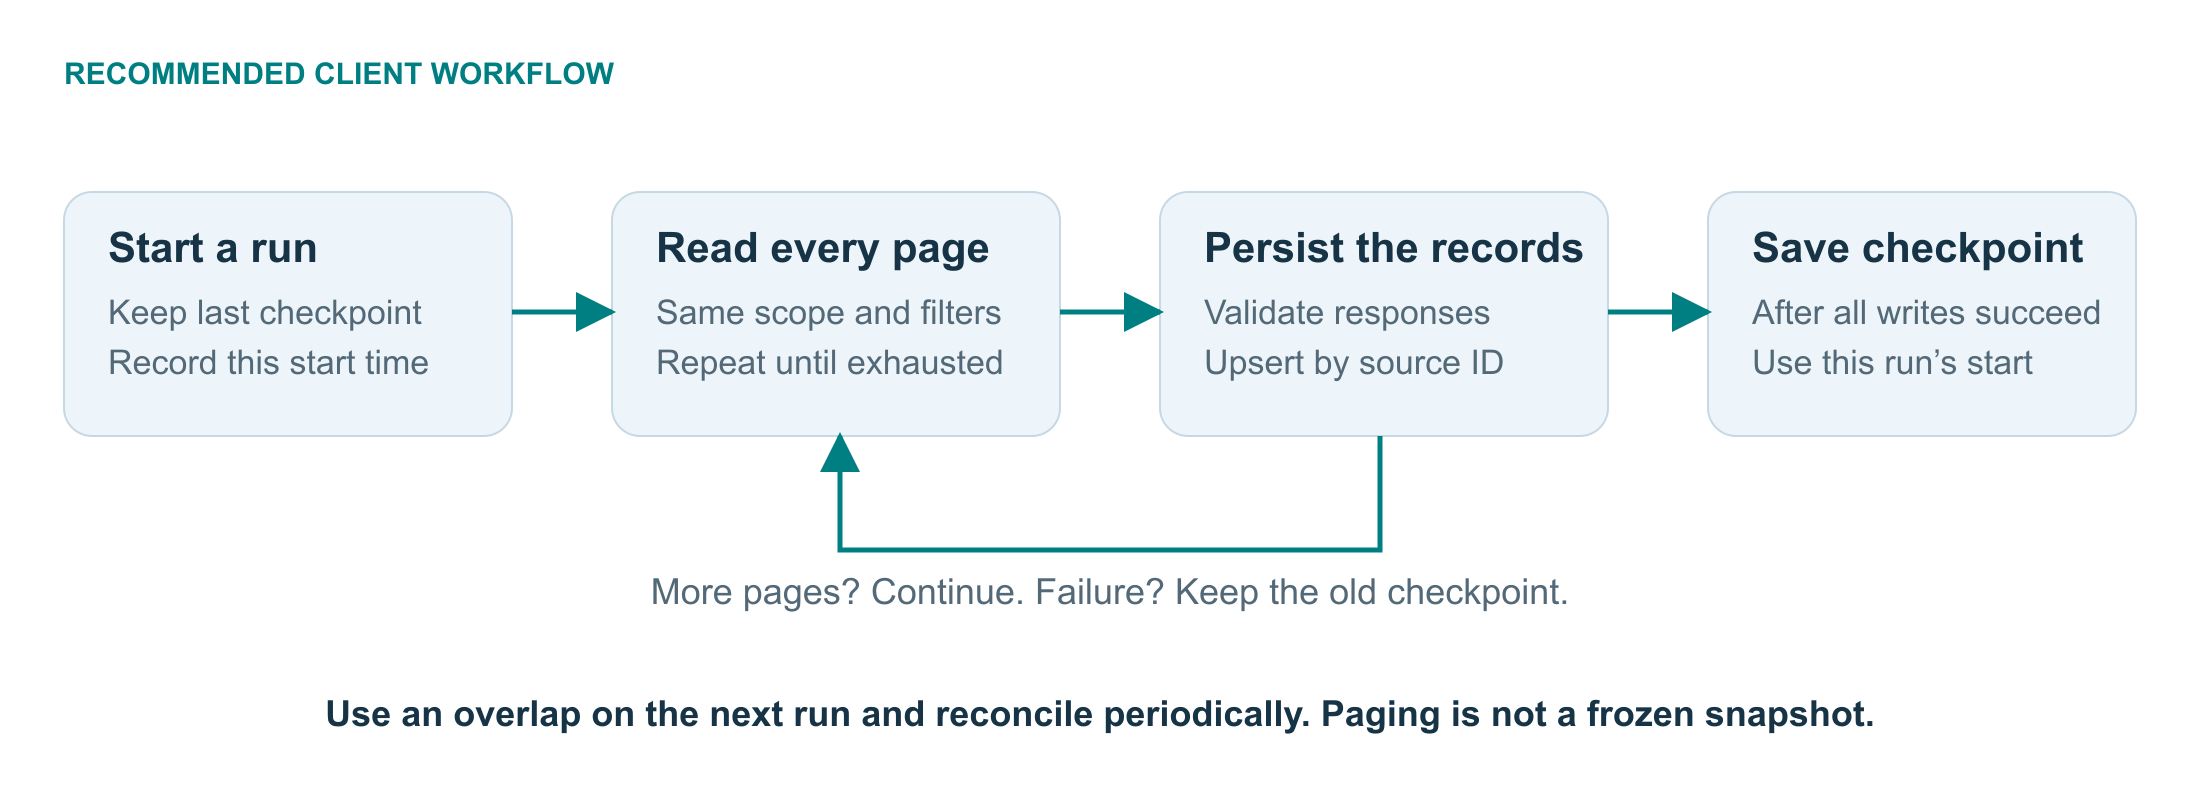
For the defects and services searches, pages start at 1 and the current maximum page size is 100. Increase pageNumber while keeping the same scope, filters and supported sort. Continue until the endpoint returns no more records; an extra empty-page read avoids treating a server-capped page as the end of the dataset. Check other endpoints individually rather than assuming these paging rules apply everywhere.
Always send an explicit sort when paging. The defects search breaks ties by record ID, so its page order is stable; sortField number is a good choice. Services search has no such tie-breaker: with scheduledDate or workOrder, records sharing the same value can move between pages, so a record may be skipped or returned twice. Upsert by ID to absorb duplicates and rely on the overlap and reconciliation described below to catch anything skipped.
Validate each response before loading it. Upsert records using their source id, together with entity type and site application context in your warehouse design. Display numbers, asset names and work order text are useful business attributes but should not replace source IDs as record keys.
Use incremental filters where available
POST /api/Defects/Search and POST /api/Services/Search both accept since in the request body, which returns records created or modified at or after the given time. Use an ISO 8601 date-time with an explicit offset, such as 2026-10-01T00:00:00Z.
POST https://api.emi3.io/api/Defects/Search
Authorization: Bearer <jwtToken>
Content-Type: application/json
Accept: application/json

{
  "pageNumber": 1,
  "pageSize": 100,
  "sortField": "number",
  "sort": "asc",
  "since": "2026-10-01T00:00:00Z"
}
POST https://api.emi3.io/api/Services/Search
Authorization: Bearer <jwtToken>
Content-Type: application/json
Accept: application/json
{
"pageNumber": 1,
"pageSize": 100,
"sortField": "scheduledDate",
"sort": "asc",
"since": "2026-10-01T00:00:00Z"
}For the defects search, fromDate and toDate filter the creation date. They do not set an upper bound on modification time. Avoid adding a creation-date window to a change feed unless you intend to exclude older defects that were edited recently.
A useful starting pattern is to record the run start time, query from the previous successful checkpoint with a small overlap, read and persist every page, then save that run start time as the next checkpoint. Re-reading an overlap is safe when warehouse writes are idempotent. Keep checkpoints per site application, endpoint and filter configuration.
Offset paging can shift as records change; it does not provide a frozen snapshot. Use explicit supported sorting, overlap and periodic reconciliation, and agree a completeness approach with EMI for large backfills. The defects and services operations accept includeDeleted, but the list responses do not mark which records are deleted, so that parameter alone is not a deletion feed. Confirm how deleted records can be identified before automating warehouse deletions.
since reflects changes made by people using EMI. Some changes made by automated processes do not update the modification time, so an incremental load can miss them. Schedule a periodic full reload of each site application (for example weekly) and treat it as required, not optional.
Record audit timestamps such as createdDateTime are UTC, even though they are returned without a Z suffix; store them as UTC. Confirm the meaning of any other date fields (for example scheduled dates) before converting them. Refresh lookup mappings periodically so changes to names or statuses are reflected in reports. A parent record’s since filter should not be assumed to capture every change to related records or lookup labels.
Keep scheduled runs observable
Record the site application, endpoint, run times, page count, row count and last completed checkpoint. Use bounded retries with backoff for transient failures, and agree polling frequency and concurrency with EMI for the expected volume. Never mark a failed or partially loaded run complete.
7. Troubleshoot requests
| Result | What to check |
|---|---|
| 400 at login or site selection | Credentials, JSON types, active account/site access and the returned message. Site selection can also fail because of licensing availability. |
| 400 on a data request | Required parameters, date formats and request schema. Omit unused optional fields instead of sending invalid empty values. |
| 401 / 403 | Bearer header, token expiry, selected site application and required read policies. Refresh or sign in again as appropriate; repeated permission failures need an access review. |
| 404 | Endpoint path, record ID and selected context. Check the record is available to this account in this site application. |
| 429 | Sign-in is limited to 10 attempts per minute from one IP address. Wait about a minute before retrying, and reuse sessions with token refresh rather than signing in again for each site application or run. |
| 5xx / timeout | Retain the checkpoint and retry the read with backoff. Escalate repeated failures with request timing and diagnostic details. |
| 200 with no records | Selected context, filters, permissions and page number. Confirm a known record before treating an empty response as a successful initial backfill. |
When contacting EMI Support, include the endpoint and method, site application ID, UTC request time, HTTP status, redacted parameters and any returned trace or correlation ID. Remove passwords, tokens, cookies and sensitive record content.
8. Prepare for your first scheduled run
- Confirm access and expected data for every target site application.
- Compare an authorised response with your parser and field mapping, including nulls and related IDs.
- Verify multiple pages, token renewal and recovery from an interrupted run.
- Agree date semantics, deletion handling, polling frequency and reconciliation.
- Check the first load against known records and totals for the same scope.
Keep the live Swagger reference alongside this guide as you implement and maintain your integration. Contact your EMI implementation team through the support portal for access and integration-specific questions.
Guide prepared against the production Swagger definition on 26 October 2026. Examples use placeholders and do not contain customer credentials or records.
Was this article helpful?
That’s Great!
Thank you for your feedback
Sorry! We couldn't be helpful
Thank you for your feedback
Feedback sent
We appreciate your effort and will try to fix the article